photoshop制作水墨画(13)
来源:未知
作者:学photoshop
学习:2271人次
总喜欢水墨画里那份淡雅、那份清静,几朵云彩、几条小鱼、几片荷叶、一朵荷花,把世界淡化了浓缩了,大千世界就剩下徘徊在心中的那点意境!
今天用photoshop把这种意境表达出来,使用"画笔工具"为主,配合"画笔"跳板及其他功能,来模拟绘制一副具有中国水墨画效果特效图像。
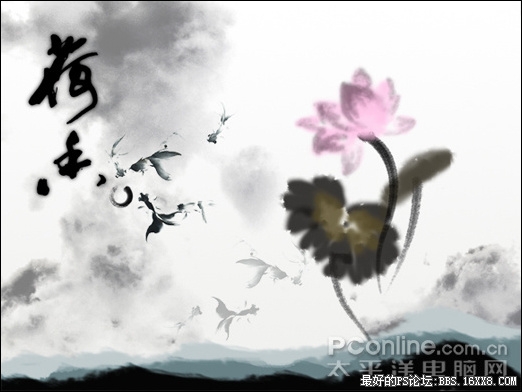
最终效果 1、按Ctrl+N组合键新建一个文件,在弹出的对话框设置"宽度"为1024像素,"高度"为768像素,"分辨率"为72像素,"颜色模式"为RGB颜色,"背景内容"为白色,然后"确定"创建一个空白文件。打开"素材1",如图1所示。使用移动工具将其移动到当前画布中,以覆盖整个画布,得到"图层1",双击"图层1"的图层缩览图,在弹出的"图层样式"对话框中设置参数如图2所示,设置"图层1"的混合模式为"排除","不透明度"为52%,按"确定"确认操作,得到如图3所示效果。
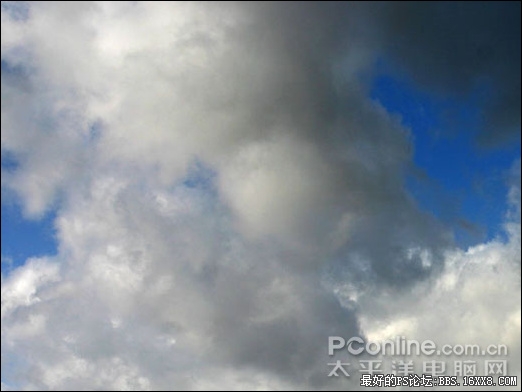
图1
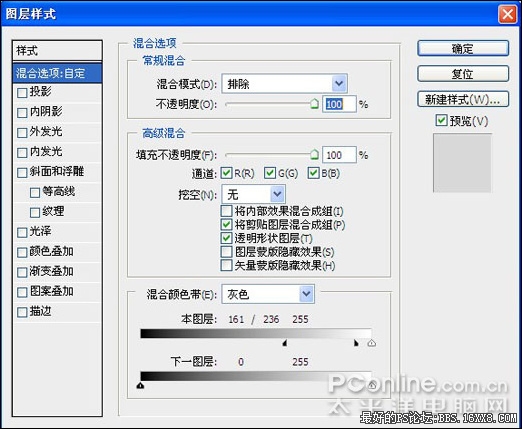
图2
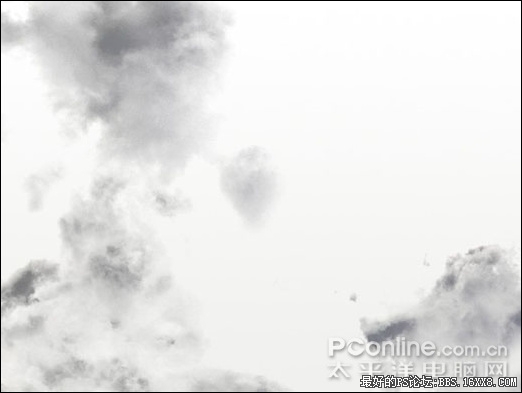
图3
2、复制"图层1"得到"图层1副本",更改"图层样式"对话框参数如图4所示,得到如图5所示效果,保持"不透明度"和"混合模式"的设置。
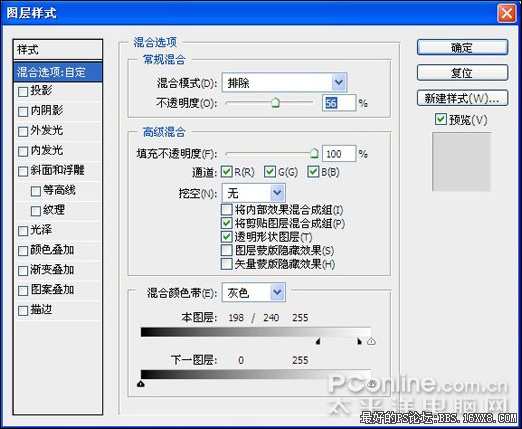
图4
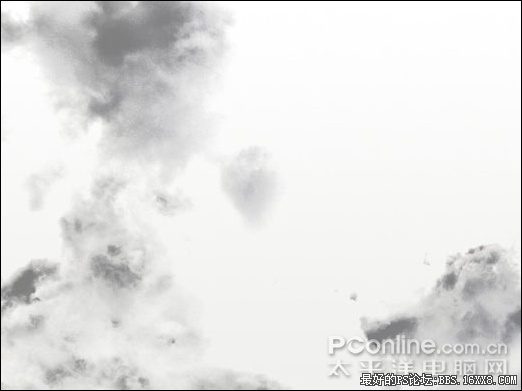
图5 3、新建一个图层得到"图层2",选择画笔工具,在其工具选项栏中选择默认的"半湿描边油彩笔",并设置前景色的颜色值为#c6c6c6,在图像的下方涂抹,如图6所示。更改前景色的颜色值分别为#777777和#040404,分别继续涂抹,得到如图7所示效果。
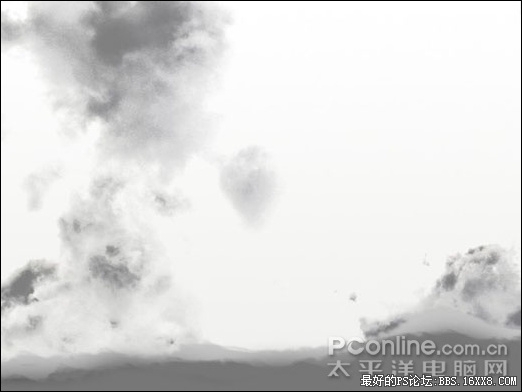
图6
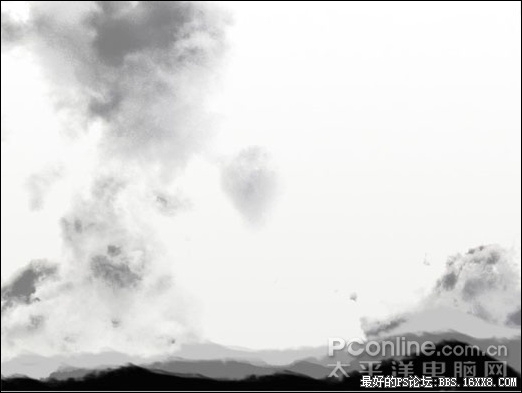
图7 4、单击创建新的填充或调整图层,在弹出的菜单中选择"色相/饱和度"命令,并设置其对话框如图8所示,单击"确定"按钮退出对话框,按Ctrl+Alta+G组合键应用"创建剪贴蒙版"命令,得到如图9所示效果,同时得到图层" 色相/饱和度1"。
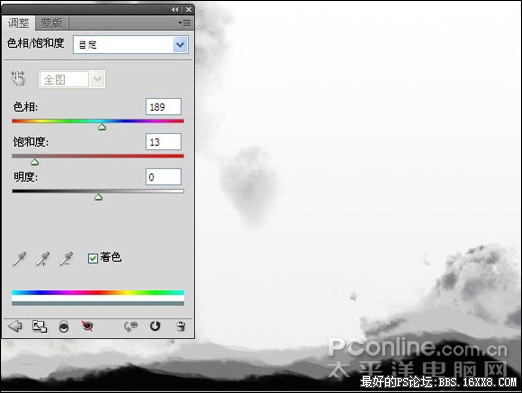
图8
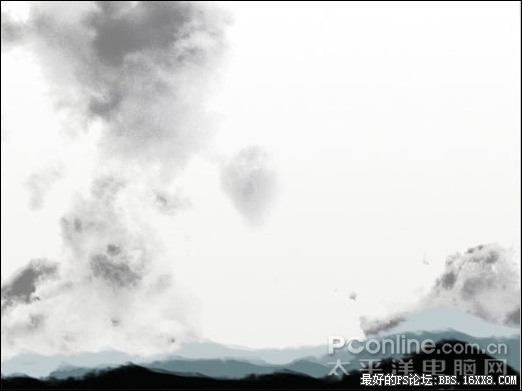
图9
5、选择画笔工具,按F5调出"画笔"调板,单击右上角的下拉小三角按钮,在弹出的菜单中选择"载入画笔"命令,然后在弹出的对话框中选择"素材2"并单击"载入"按钮载入画笔。
6、新建一个图层得到"图层3",选择画笔工具,在其工具选项栏中选择"柔角"画笔,大小选择20像素,"不透明度"为50%,然后按F5调出"画笔"面板,并设置其调板参数如图10所示。设置前景色的颜色值为#fecdea,然后在画布的右侧绘制图像,如图11所示。
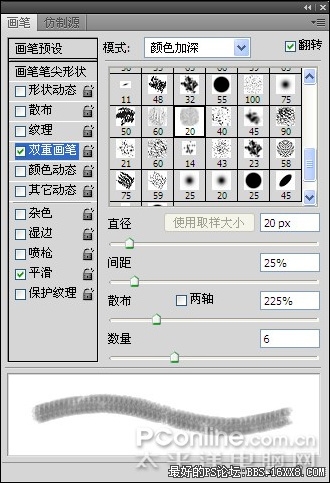
图10

图11 7、保持上一步的设置,在画笔工具选项栏中更改"不透明度"为100%,继续在图像上绘制,如图12所示。
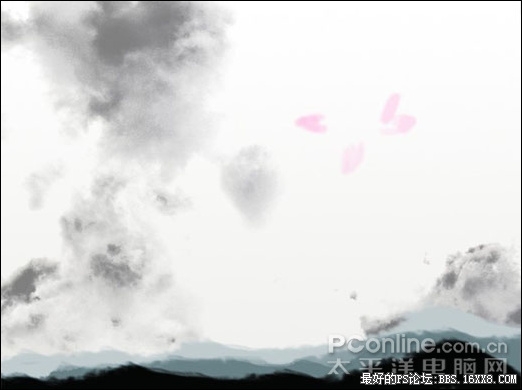
图12 8、新建一个图层得到"图层4",选择画笔工具,在其工具选项栏中选择"柔角"画笔,大小选择15像素,然后按F5调出"画笔"调板,并设置其调板参数如图13所示。设置前景色的颜色值为#c2aed9,在画布右侧绘制图像,如图14所示。
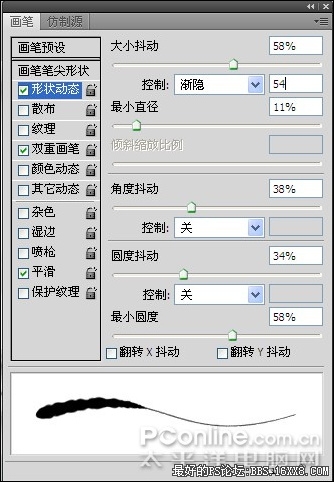
图13
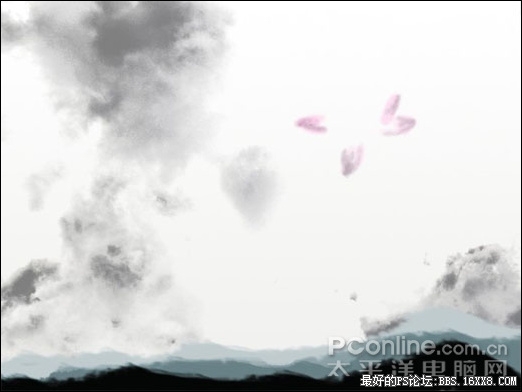
图14 9、新建一个图层得到"图层5",选择画笔工具,在其工具选项栏中选择"柔角"画笔,大小选择40像素,然后按F5调出"画笔"调板,并设置其调板参数如图15所示。设置前景色的颜色值为#fdccea,在画布的右侧绘制图像如图16所示。
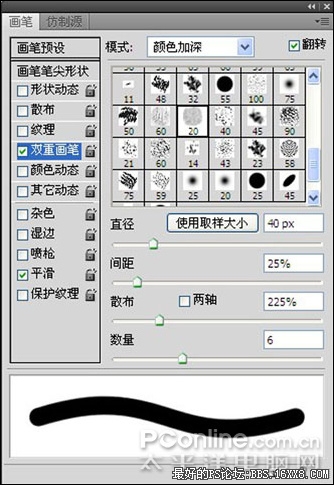
图15
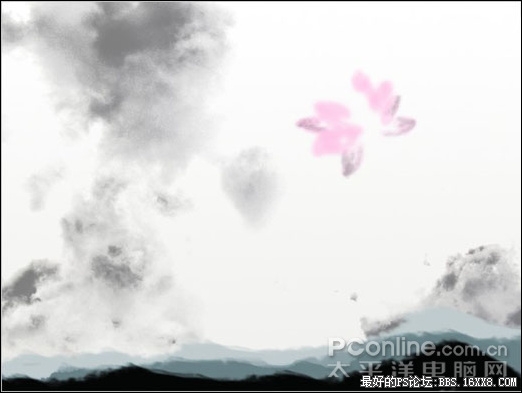
图16
10、新建一个图层得到"图层6",选择画笔工具,在其工具选项栏中选择"柔角"画笔,大小选择20像素,然后按F5调出"画笔"调板,并设置其调板参数如图17所示。设置前景色的颜色值为#7b6d75,在画布右侧绘制图像,设置其混合模式为"正片叠底","不透明度"为75%,得到如图18所示效果。
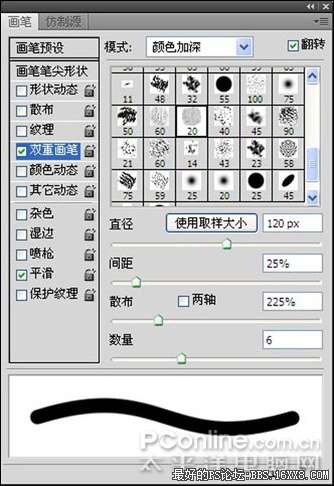
图17
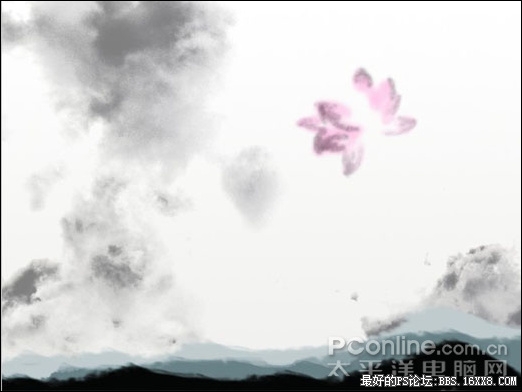
图18 11、按第8到第10步相同的方法,新建"图层7"和"图层8"绘制如图19所示效果。

图19 12、单价添加图层蒙版为"图层8"添加图层蒙版,设置前景色为黑色,选择画笔工具,并在其工具选项栏中设置适当大小及步透明度,然后在图层蒙版中进行涂抹,得到如图20所示效果,此时图层蒙版中的状态如图21所示。

图20
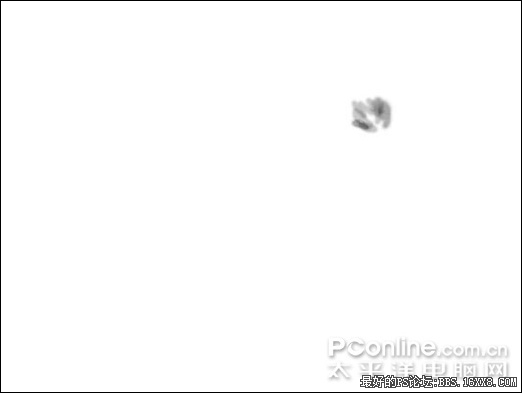
图21 13、新建一个图层得到"图层9",选择钢笔工具,在图像的右侧绘制一条路径,如图22所示。切换到"路径"调板,按Alt键单击用画笔描边路径按钮,在弹出的对话框中选中"模拟压力"选项,单击确定,隐藏路径后得到如图23所示。
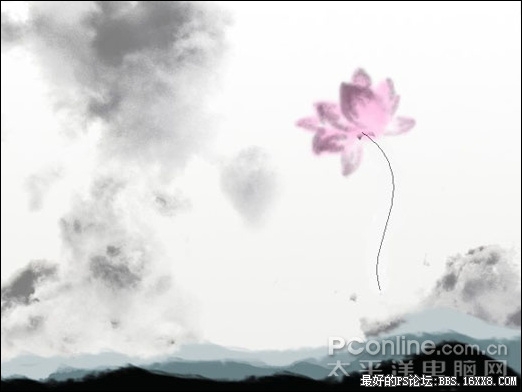
图22
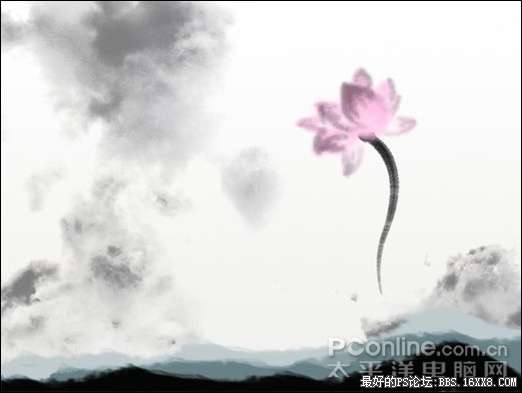
图23
14、选择"色相/饱和度1",新建一个图层得到"图层10",选择画笔工具,在其工具选项栏中选择"柔角",大小35像素,按F5调出画笔调板,设置调板参数如图24所示,设置前景色的值为#33312f,在画布的右侧绘制图像,得到如图25所示。
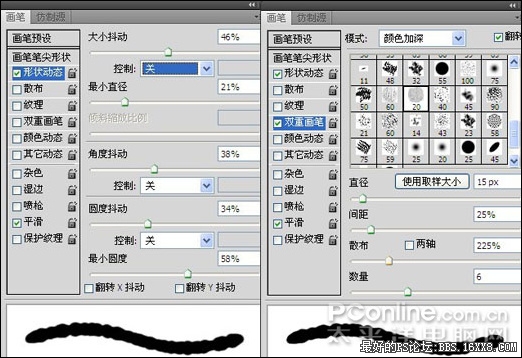
图24

图25 15、新建一个图层得到"图层11",更改前景色的值为#7a6f4a,在工具选项栏上更改不同明度为80%,其它参数保持前设置,在图像上继续涂抹,得到如图26所示效果。复制"图层11"得到"图层11副本",设置11副本的混合模式为"正片叠底","不透明度"为60%,得到如图27所示。
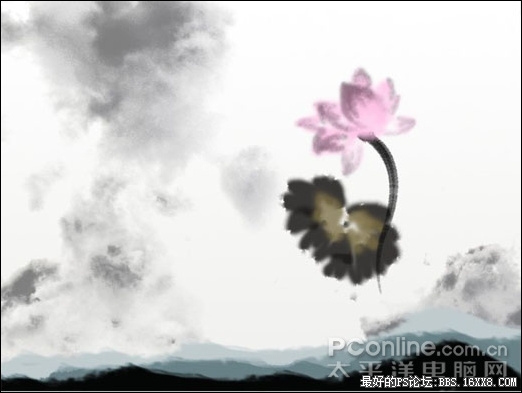
图26

图27 16、新建图层得到"图层12"选择画笔工具,在其选项栏中选择默认的"粗边圆形钢笔",大小选择30像素,然后按F5调出"画笔"调板,并设置其参数如图28所示。选择钢笔工具,在图像右侧绘制一条路径,如图29所示,切换到"路径"调板,按Alt键单击用画笔描边路径按钮,在弹出的对话框中选中"模拟压力"选项,单击确定,隐藏路径后得到如图30所示效果。然后返回到"图层"调板,拖动"图层12"至"图层10"的下方。
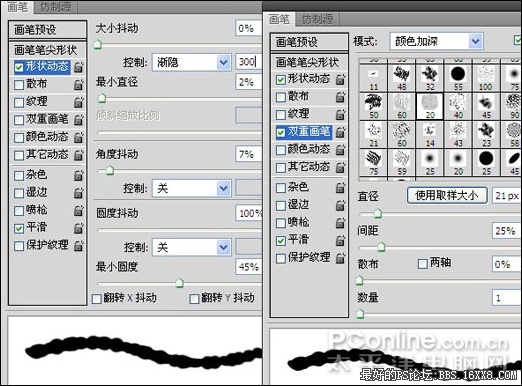
图28

图29

图30
17、选择"图层11副本",新建一个图层得到"图层13",选择画笔工具,在其工具选项栏中选择"柔角"画笔,大小选择35像素,按F5调出"画笔"调板,并设置其调板参数如图31所示,设置前景色的值为#4d483c,在画布右侧绘制图像,设置其"不透明度"为90%,得到如图32所示效果。
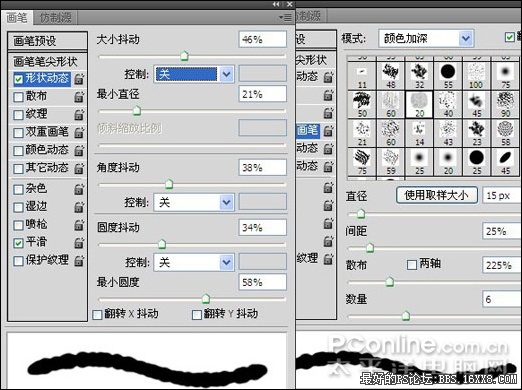
图31
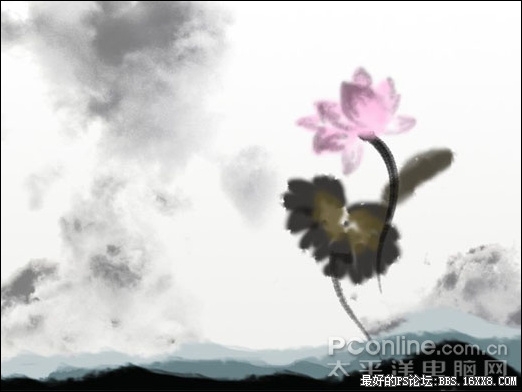
图32 18、新建一个图层得到"图层14",选择画笔工具,在其工具栏中设置画笔参数如步骤16。选择钢笔工具,在图像右侧绘制一条路径,切换到"路径"调板,按Alt键单击用画笔描边路劲按钮,在弹出的对话框中选择"模拟压力"选项,确定退出对话框,隐藏路径后得到如图33所示效果。然后返回到"图层"调板,拖动"图层14"至"图层13"的下方。
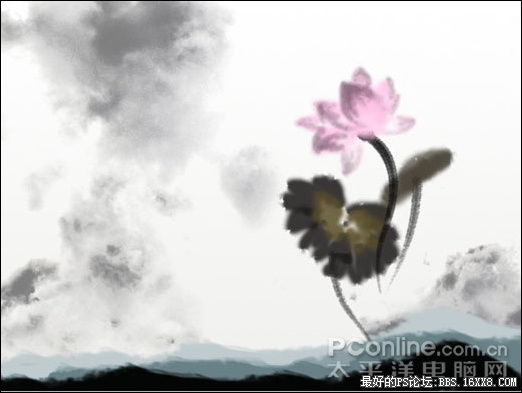
图33
19、选择"图层8",打开"素材3",如图34所示,用移动工具将其移动到当前话不中,放置在图像的左侧,得到"图层15",复制"图层15"得到"图层15副本",使用移动工具移动图像的下方,按Ctrl+T组合键调出自由变换控制框,在变换控制框中点击鼠标右键,在弹出的快捷菜单中选择"水平翻转"命令,按回车确认,然后设置"图层15副本"的"不透明度"为30%,得到如图35所示效果。
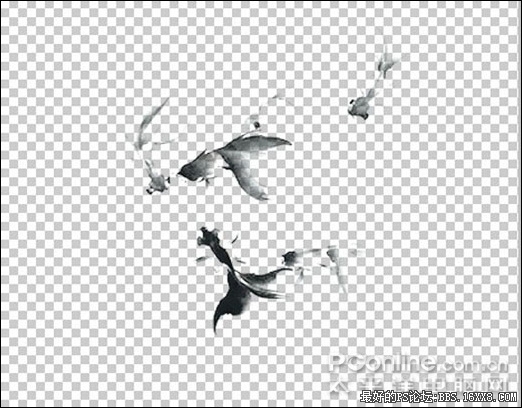
图34
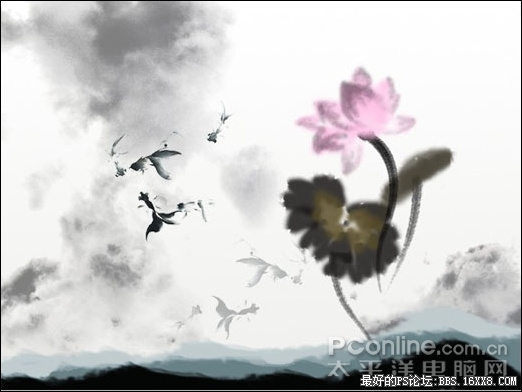
图35
20、打开"素材4",如图36所示,使用移动工具将其移动到当前画布中,放置在左侧,得到"图层16",设置"图层16"的混合模式为"正片叠底",如图37所示。复制"图层16"得到"图层16副本",移动"图层16副本"图层位置到"图层16"的下方,选择"滤镜"|"模糊"|"高斯模糊"命令,并设置其半径像素为4像素。得到如图38所示。

图36
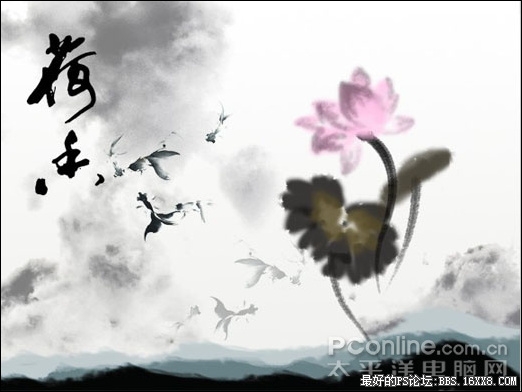
图37
图38
photoshop教程
21、打开"素材5"如图39所示,用移动工具将前移动到当前画布中,放置在左侧,得到"图层17"设置"图层17"的混合模式为"正片叠底",此时"图层"调板如图40所示,得到如图41所示最终效果。
图39
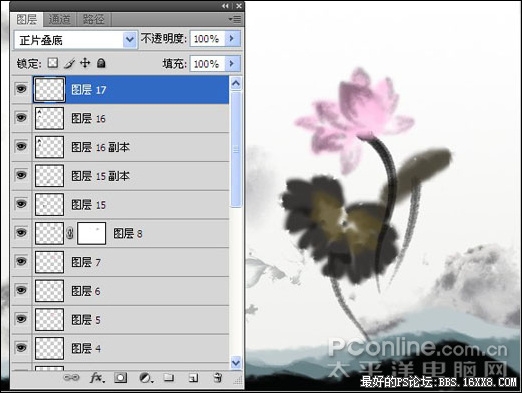
图40
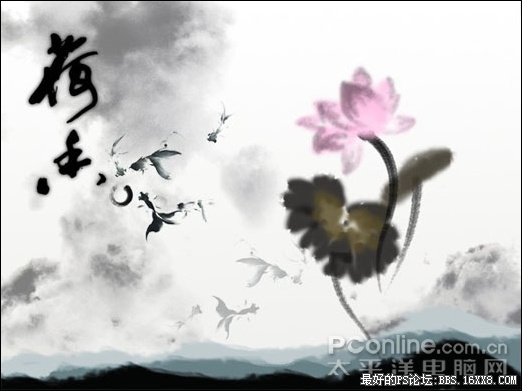
图41
作者:木易 来源:太平洋电脑网
今天用photoshop把这种意境表达出来,使用"画笔工具"为主,配合"画笔"跳板及其他功能,来模拟绘制一副具有中国水墨画效果特效图像。
最终效果 1、按Ctrl+N组合键新建一个文件,在弹出的对话框设置"宽度"为1024像素,"高度"为768像素,"分辨率"为72像素,"颜色模式"为RGB颜色,"背景内容"为白色,然后"确定"创建一个空白文件。打开"素材1",如图1所示。使用移动工具将其移动到当前画布中,以覆盖整个画布,得到"图层1",双击"图层1"的图层缩览图,在弹出的"图层样式"对话框中设置参数如图2所示,设置"图层1"的混合模式为"排除","不透明度"为52%,按"确定"确认操作,得到如图3所示效果。
图1
图2
图3
2、复制"图层1"得到"图层1副本",更改"图层样式"对话框参数如图4所示,得到如图5所示效果,保持"不透明度"和"混合模式"的设置。
图4
图5 3、新建一个图层得到"图层2",选择画笔工具,在其工具选项栏中选择默认的"半湿描边油彩笔",并设置前景色的颜色值为#c6c6c6,在图像的下方涂抹,如图6所示。更改前景色的颜色值分别为#777777和#040404,分别继续涂抹,得到如图7所示效果。
图6
图7 4、单击创建新的填充或调整图层,在弹出的菜单中选择"色相/饱和度"命令,并设置其对话框如图8所示,单击"确定"按钮退出对话框,按Ctrl+Alta+G组合键应用"创建剪贴蒙版"命令,得到如图9所示效果,同时得到图层" 色相/饱和度1"。
图8
图9
5、选择画笔工具,按F5调出"画笔"调板,单击右上角的下拉小三角按钮,在弹出的菜单中选择"载入画笔"命令,然后在弹出的对话框中选择"素材2"并单击"载入"按钮载入画笔。
6、新建一个图层得到"图层3",选择画笔工具,在其工具选项栏中选择"柔角"画笔,大小选择20像素,"不透明度"为50%,然后按F5调出"画笔"面板,并设置其调板参数如图10所示。设置前景色的颜色值为#fecdea,然后在画布的右侧绘制图像,如图11所示。
图10
图11 7、保持上一步的设置,在画笔工具选项栏中更改"不透明度"为100%,继续在图像上绘制,如图12所示。
图12 8、新建一个图层得到"图层4",选择画笔工具,在其工具选项栏中选择"柔角"画笔,大小选择15像素,然后按F5调出"画笔"调板,并设置其调板参数如图13所示。设置前景色的颜色值为#c2aed9,在画布右侧绘制图像,如图14所示。
图13
图14 9、新建一个图层得到"图层5",选择画笔工具,在其工具选项栏中选择"柔角"画笔,大小选择40像素,然后按F5调出"画笔"调板,并设置其调板参数如图15所示。设置前景色的颜色值为#fdccea,在画布的右侧绘制图像如图16所示。
图15
图16
10、新建一个图层得到"图层6",选择画笔工具,在其工具选项栏中选择"柔角"画笔,大小选择20像素,然后按F5调出"画笔"调板,并设置其调板参数如图17所示。设置前景色的颜色值为#7b6d75,在画布右侧绘制图像,设置其混合模式为"正片叠底","不透明度"为75%,得到如图18所示效果。
图17
图18 11、按第8到第10步相同的方法,新建"图层7"和"图层8"绘制如图19所示效果。
图19 12、单价添加图层蒙版为"图层8"添加图层蒙版,设置前景色为黑色,选择画笔工具,并在其工具选项栏中设置适当大小及步透明度,然后在图层蒙版中进行涂抹,得到如图20所示效果,此时图层蒙版中的状态如图21所示。
图20
图21 13、新建一个图层得到"图层9",选择钢笔工具,在图像的右侧绘制一条路径,如图22所示。切换到"路径"调板,按Alt键单击用画笔描边路径按钮,在弹出的对话框中选中"模拟压力"选项,单击确定,隐藏路径后得到如图23所示。
图22
图23
14、选择"色相/饱和度1",新建一个图层得到"图层10",选择画笔工具,在其工具选项栏中选择"柔角",大小35像素,按F5调出画笔调板,设置调板参数如图24所示,设置前景色的值为#33312f,在画布的右侧绘制图像,得到如图25所示。
图24
图25 15、新建一个图层得到"图层11",更改前景色的值为#7a6f4a,在工具选项栏上更改不同明度为80%,其它参数保持前设置,在图像上继续涂抹,得到如图26所示效果。复制"图层11"得到"图层11副本",设置11副本的混合模式为"正片叠底","不透明度"为60%,得到如图27所示。
图26
图27 16、新建图层得到"图层12"选择画笔工具,在其选项栏中选择默认的"粗边圆形钢笔",大小选择30像素,然后按F5调出"画笔"调板,并设置其参数如图28所示。选择钢笔工具,在图像右侧绘制一条路径,如图29所示,切换到"路径"调板,按Alt键单击用画笔描边路径按钮,在弹出的对话框中选中"模拟压力"选项,单击确定,隐藏路径后得到如图30所示效果。然后返回到"图层"调板,拖动"图层12"至"图层10"的下方。
图28
图29
图30
17、选择"图层11副本",新建一个图层得到"图层13",选择画笔工具,在其工具选项栏中选择"柔角"画笔,大小选择35像素,按F5调出"画笔"调板,并设置其调板参数如图31所示,设置前景色的值为#4d483c,在画布右侧绘制图像,设置其"不透明度"为90%,得到如图32所示效果。
图31
图32 18、新建一个图层得到"图层14",选择画笔工具,在其工具栏中设置画笔参数如步骤16。选择钢笔工具,在图像右侧绘制一条路径,切换到"路径"调板,按Alt键单击用画笔描边路劲按钮,在弹出的对话框中选择"模拟压力"选项,确定退出对话框,隐藏路径后得到如图33所示效果。然后返回到"图层"调板,拖动"图层14"至"图层13"的下方。
图33
19、选择"图层8",打开"素材3",如图34所示,用移动工具将其移动到当前话不中,放置在图像的左侧,得到"图层15",复制"图层15"得到"图层15副本",使用移动工具移动图像的下方,按Ctrl+T组合键调出自由变换控制框,在变换控制框中点击鼠标右键,在弹出的快捷菜单中选择"水平翻转"命令,按回车确认,然后设置"图层15副本"的"不透明度"为30%,得到如图35所示效果。
图34
图35
20、打开"素材4",如图36所示,使用移动工具将其移动到当前画布中,放置在左侧,得到"图层16",设置"图层16"的混合模式为"正片叠底",如图37所示。复制"图层16"得到"图层16副本",移动"图层16副本"图层位置到"图层16"的下方,选择"滤镜"|"模糊"|"高斯模糊"命令,并设置其半径像素为4像素。得到如图38所示。
图36
图37
图38
photoshop教程
21、打开"素材5"如图39所示,用移动工具将前移动到当前画布中,放置在左侧,得到"图层17"设置"图层17"的混合模式为"正片叠底",此时"图层"调板如图40所示,得到如图41所示最终效果。
图39
图40
图41
作者:木易 来源:太平洋电脑网
学习 · 提示
相关教程
关注大神微博加入>>


网友求助,请回答!