photoshop合成教程:蒙太奇插画(3)
来源:未知
作者:oosodof
学习:1405人次
什么是蒙太奇插画?“蒙太奇手法”指电影剪辑中的镜头剪接特效手法,顾名思义,“[b]蒙太奇插画[/b]”指的是将多幅图片有机的剪接组合,形成插画风格的图片。
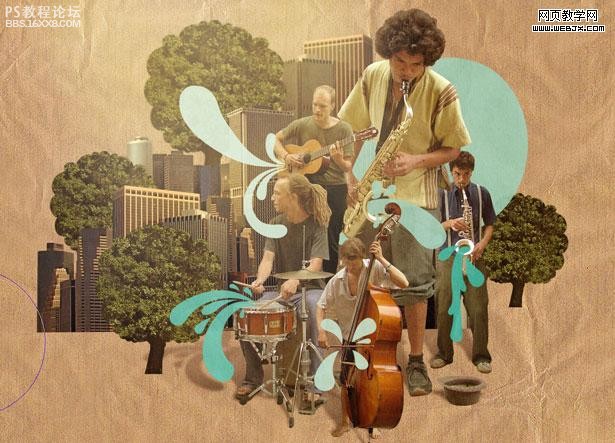
这项看似复杂的技术其实很简单,我们今天就仅使用[b]photoshop[/b],在[b]十三步[/b]之内制作出一副精美的蒙太奇插画,先来看看效果:
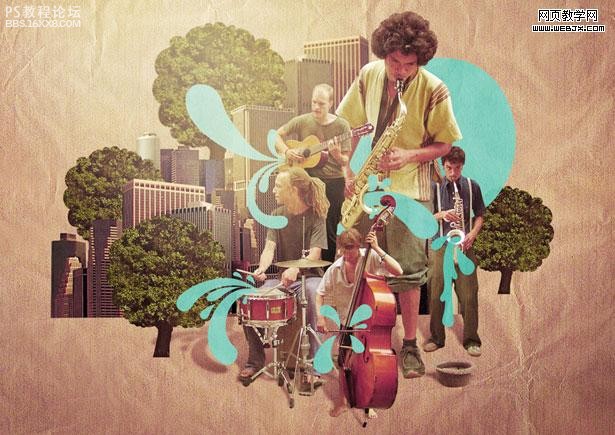
是不是很有感觉?好了,打开你的photoshop,跟我一起来吧。
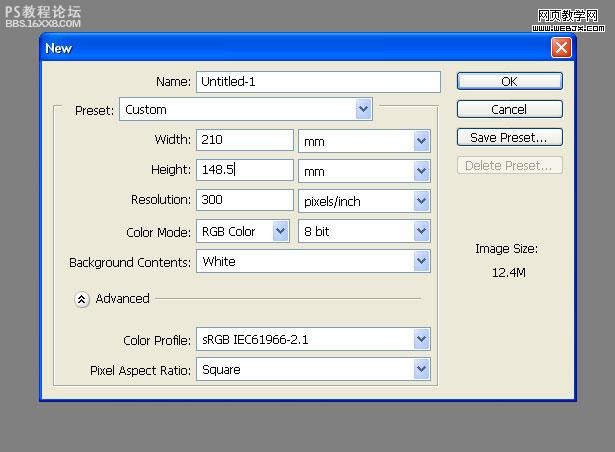
第一步 设置画布
为了方便和精确地处理图片,我们使用[b]300dpi[/b]的分辨率,新建一个[b]A5 landscape[/b] (210mm x 148.5mm)的画布:
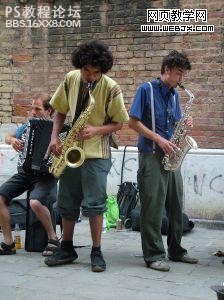
,第二步 处理人像我们从素材网站上得到一副清晰的乐手图片:
选择“[b]钢笔工具[/b]”,设置为“[b]路径[/b]”,将这个萨克斯手抠出来,头发不用扣的很细,因为我们恰恰需要这种圆钝的效果:
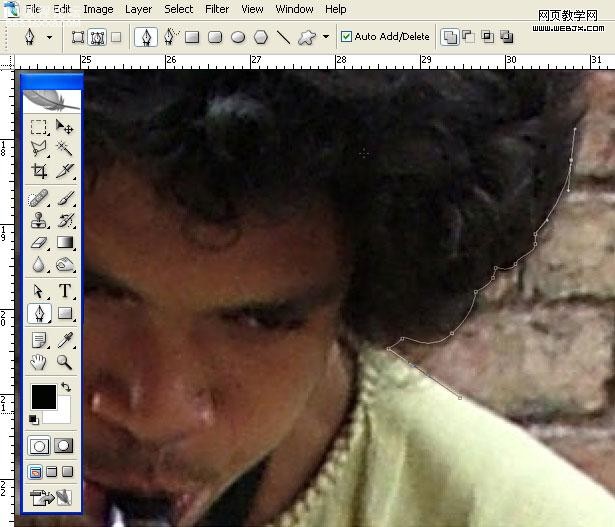
因为最后的出图分辨率会缩小,所以不用太计较细节:
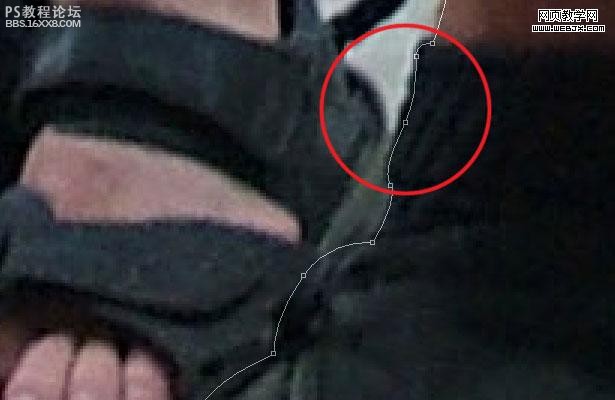
要注意[b]封闭区域[/b]的处理:
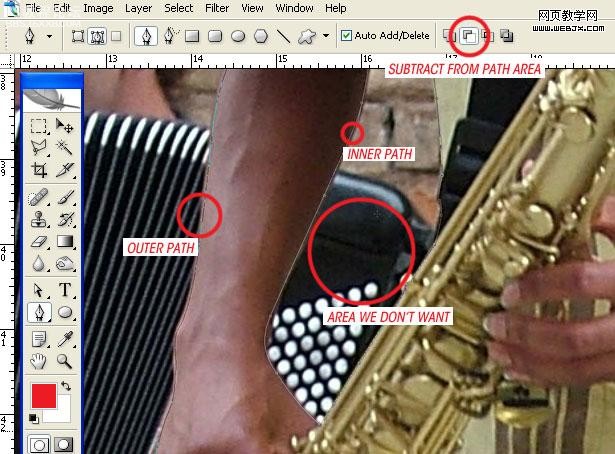
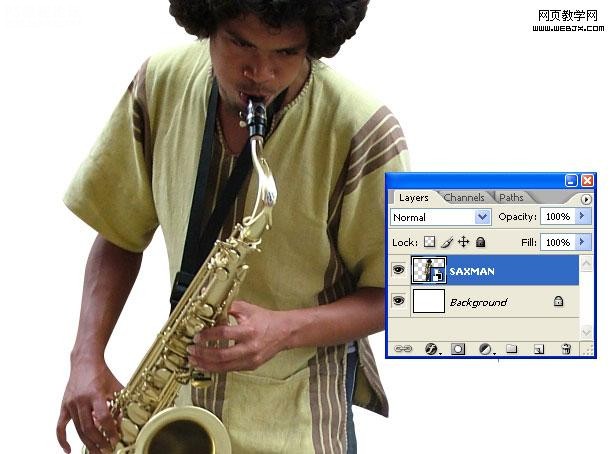
,第三步 去除背景将闭合路径“[b]创建选区[/b]”,将萨克斯手复制到新图层并建立[b]智能对象[/b],以便后期处理。
第四步 处理其他人像
把图片中其他的乐手抠出来,分别建立[b]智能对象[/b]:
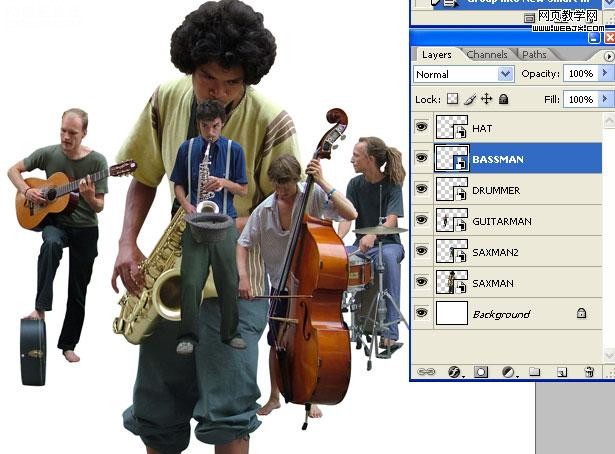
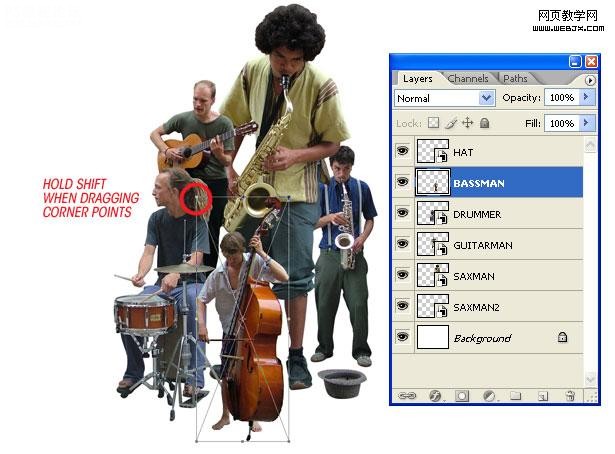
第四步 调整人像位置和大小
组合这些乐手的大小和位置到你满意的效果:
,第五步 设置背景我们又从这个网站上找到一副牛皮纸背景图片:

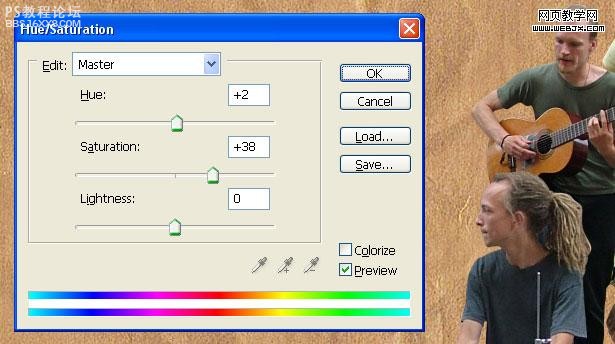
处理背景的尺寸和位置,以适合整幅图片,然后调整“[b]色相/饱和度[/b]”:
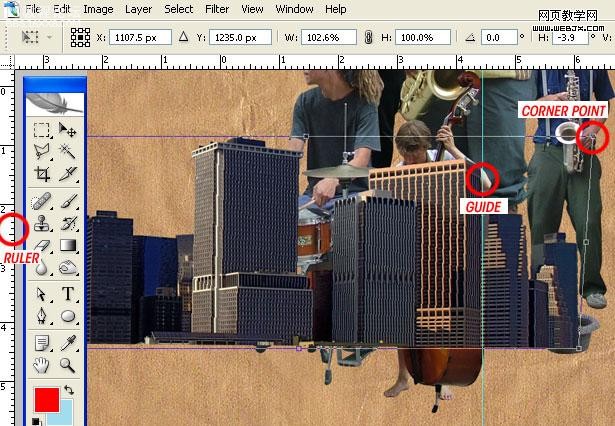
,第六步 处理建筑图片我们找到这样一幅高清晰建筑图片:

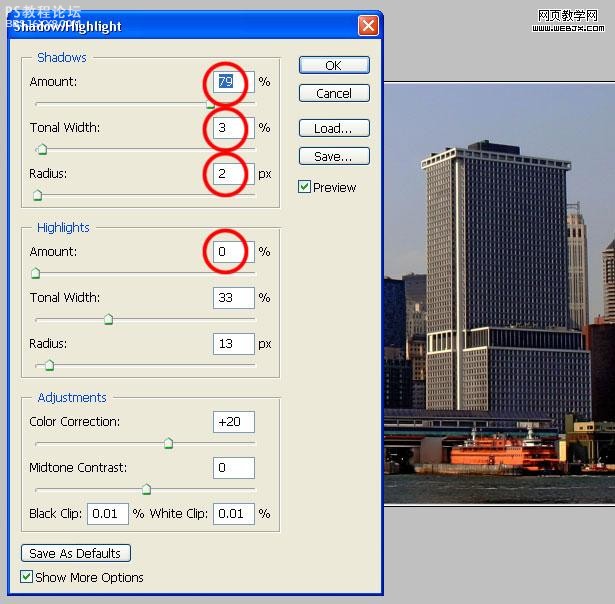
这幅图片阴影较重,不便处理,我们使用“[b]阴影/高光[/b]”调高对比度:
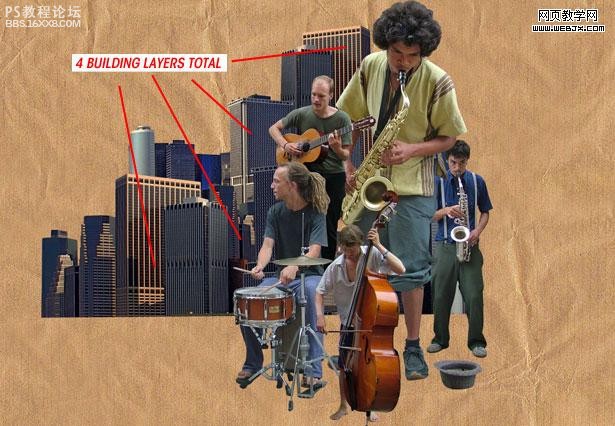
,第七步 缩放和摆放图片
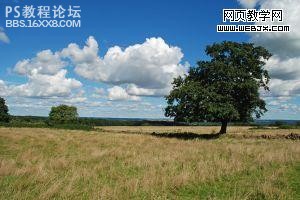
,第八步 处理树木我们找到一副树木的高清图片:
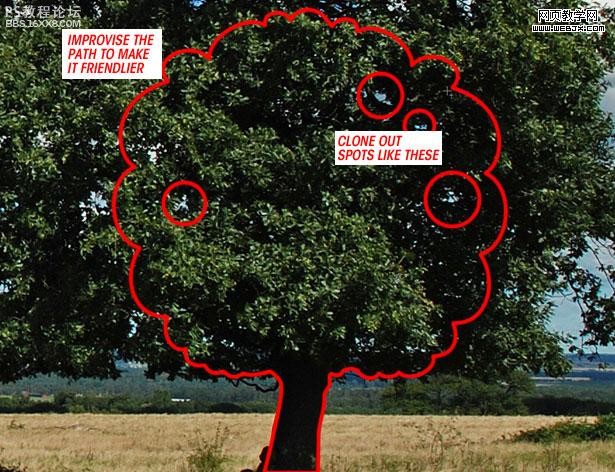
使用[b]钢笔工具[/b]选出圆形的一棵树,注意树叶稀疏的地方要使用“[b]克隆[/b]”工具或者“[b]仿制图章[/b]”填补上:
复制几棵,摆好:
,第九步 制作图案选择“[b]钢笔工具[/b]”并设置为“[b]形状图层[/b]”,挑选一个合适的前景色,勾勒出简洁的图案:
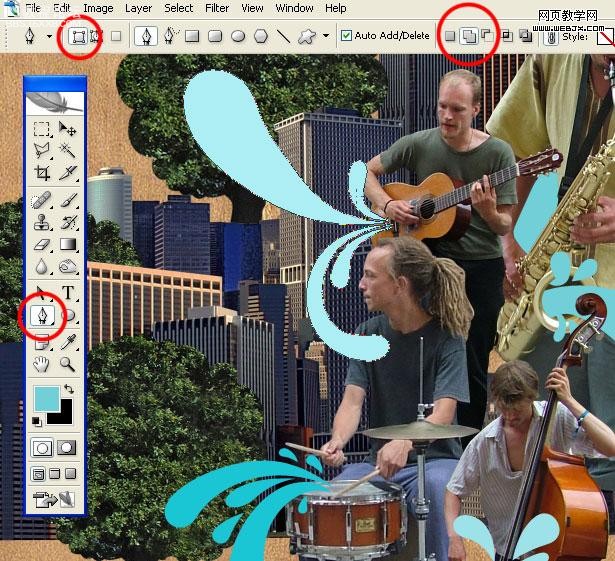
添加[b]阴影效果[/b]:
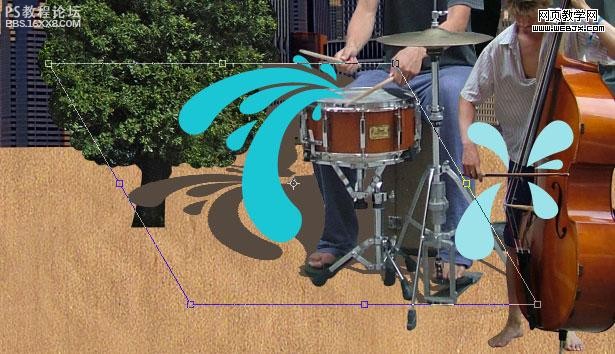
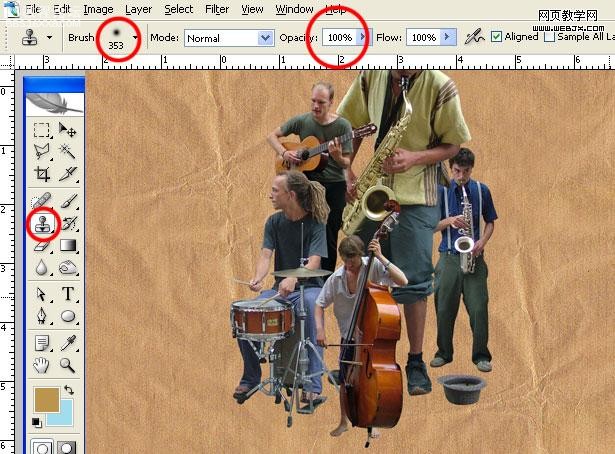
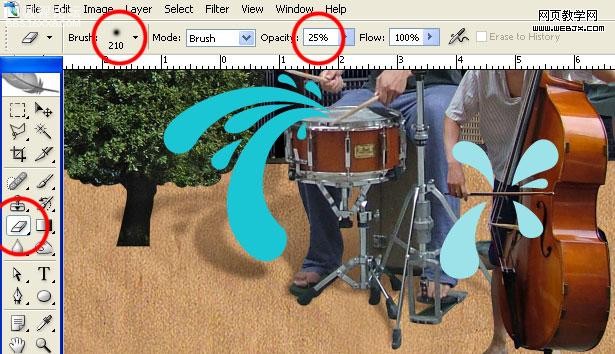
,第十步 处理细节用[b]橡皮工具[/b]和[b]多边形索套[/b]抹掉一些不合适的细节
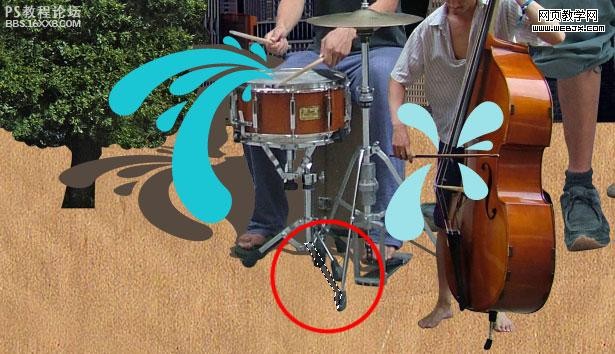
设置5像素的[b]高斯模糊[/b],然后设置图层的[b]混合模式[/b]和[b]透明度[/b]:
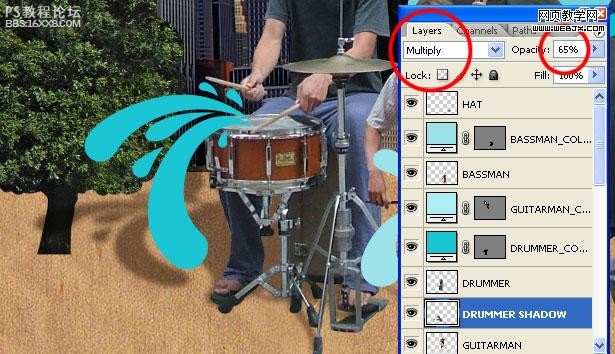
使用[b]软边橡皮擦工具[/b],进一步柔化图像
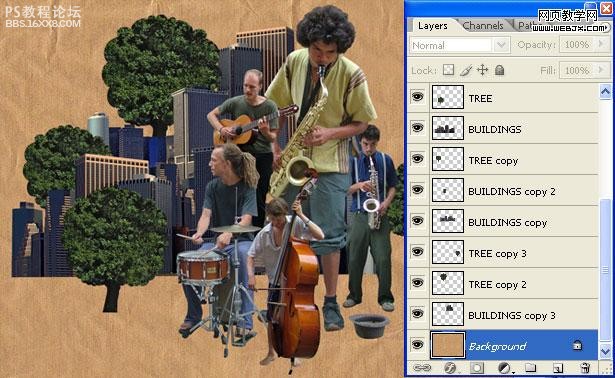
,第十一步 统一画面效果现在我们要把乐手、树木和建筑的色彩风格都统一到背景的样式。
[b]复制[/b]背景到最顶层。
选择除背景以外的层,为最顶层添加[b]图层蒙版[/b]:
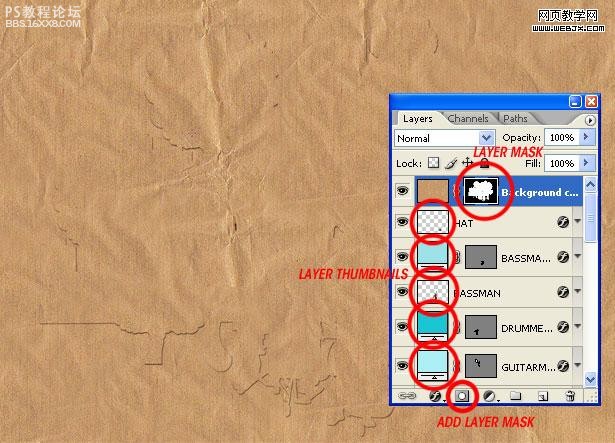
将顶层的混合模式设为[b]柔光[/b] ,把蒙版设为[b]颜色[/b] ,不透明度设为20%
然后将这些图层[b]流量[/b]设为90%:

,第十二步 设置发光在最上层[b]新建[/b]一层,使用大半径[b]笔刷[/b],低[b]流量[/b],点出朦胧的光”
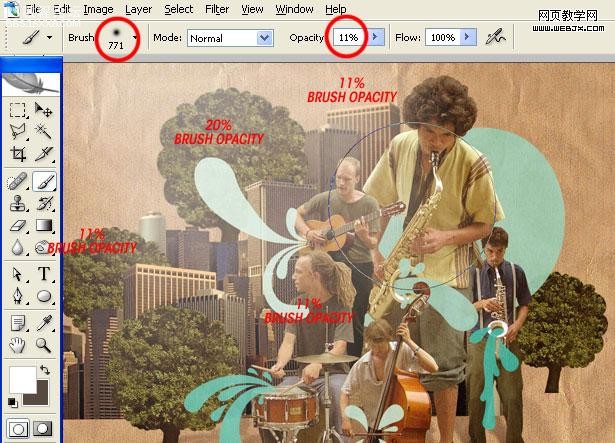
[b]新建[/b]一层使用同样的方法点一个黄色( #ffcc00 )光点,设置[b]混合模式[/b]为“[b]覆盖[/b]”
,
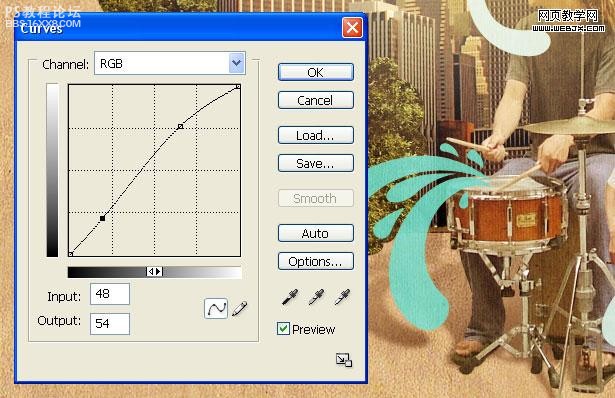
第十三步 调整色调下面调整一些图层的色调,首先使用[b]曲线工具[/b]:
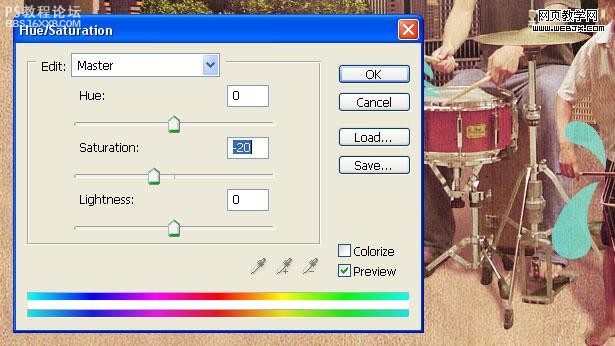
[b]色相/饱和度:[/b]
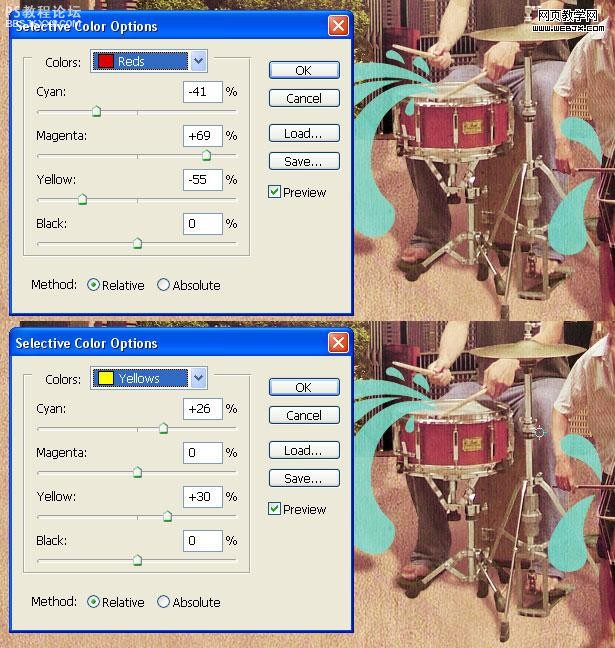
[b]选择颜色:[/b]
最终效果
作者:佚名 出处:外攵翻譯
这项看似复杂的技术其实很简单,我们今天就仅使用[b]photoshop[/b],在[b]十三步[/b]之内制作出一副精美的蒙太奇插画,先来看看效果:
是不是很有感觉?好了,打开你的photoshop,跟我一起来吧。
第一步 设置画布
为了方便和精确地处理图片,我们使用[b]300dpi[/b]的分辨率,新建一个[b]A5 landscape[/b] (210mm x 148.5mm)的画布:
,第二步 处理人像我们从素材网站上得到一副清晰的乐手图片:
选择“[b]钢笔工具[/b]”,设置为“[b]路径[/b]”,将这个萨克斯手抠出来,头发不用扣的很细,因为我们恰恰需要这种圆钝的效果:
因为最后的出图分辨率会缩小,所以不用太计较细节:
要注意[b]封闭区域[/b]的处理:
,第三步 去除背景将闭合路径“[b]创建选区[/b]”,将萨克斯手复制到新图层并建立[b]智能对象[/b],以便后期处理。
第四步 处理其他人像
把图片中其他的乐手抠出来,分别建立[b]智能对象[/b]:
第四步 调整人像位置和大小
组合这些乐手的大小和位置到你满意的效果:
,第五步 设置背景我们又从这个网站上找到一副牛皮纸背景图片:
处理背景的尺寸和位置,以适合整幅图片,然后调整“[b]色相/饱和度[/b]”:
,第六步 处理建筑图片我们找到这样一幅高清晰建筑图片:
这幅图片阴影较重,不便处理,我们使用“[b]阴影/高光[/b]”调高对比度:
,第七步 缩放和摆放图片
,第八步 处理树木我们找到一副树木的高清图片:
使用[b]钢笔工具[/b]选出圆形的一棵树,注意树叶稀疏的地方要使用“[b]克隆[/b]”工具或者“[b]仿制图章[/b]”填补上:
复制几棵,摆好:
,第九步 制作图案选择“[b]钢笔工具[/b]”并设置为“[b]形状图层[/b]”,挑选一个合适的前景色,勾勒出简洁的图案:
添加[b]阴影效果[/b]:
,第十步 处理细节用[b]橡皮工具[/b]和[b]多边形索套[/b]抹掉一些不合适的细节
设置5像素的[b]高斯模糊[/b],然后设置图层的[b]混合模式[/b]和[b]透明度[/b]:
使用[b]软边橡皮擦工具[/b],进一步柔化图像
,第十一步 统一画面效果现在我们要把乐手、树木和建筑的色彩风格都统一到背景的样式。
[b]复制[/b]背景到最顶层。
选择除背景以外的层,为最顶层添加[b]图层蒙版[/b]:
将顶层的混合模式设为[b]柔光[/b] ,把蒙版设为[b]颜色[/b] ,不透明度设为20%
然后将这些图层[b]流量[/b]设为90%:
,第十二步 设置发光在最上层[b]新建[/b]一层,使用大半径[b]笔刷[/b],低[b]流量[/b],点出朦胧的光”
[b]新建[/b]一层使用同样的方法点一个黄色( #ffcc00 )光点,设置[b]混合模式[/b]为“[b]覆盖[/b]”
,
第十三步 调整色调下面调整一些图层的色调,首先使用[b]曲线工具[/b]:
[b]色相/饱和度:[/b]
[b]选择颜色:[/b]
最终效果
作者:佚名 出处:外攵翻譯
学习 · 提示
- 发评论 | 交作业 -
最新评论
fenghanguo2011-06-19 09:32
很实用,谢谢分享。
回复
武可承2011-03-22 08:56
无父无母的孤儿没钱吃饭,愿意卖身,卖B。请求好心人干我。我的QQ号是:123651104我的QQ号是:644167021我的QQ号是:578062345我的QQ号是:279386906我的QQ号是:378203070我的QQ号是:76392248在QQ游戏别太高调,别动不动骂人,儿子.儿子们想删帖找你爹Q:282728+223
相关教程
关注大神微博加入>>


网友求助,请回答!