[非主流PS教程] 非主流图片制作教程:非主流蓝色格调
来源:不详
作者:佚名
学习:477人次
非主流图片制作教程:非主流蓝色格调主要是介绍蓝色格调非主流色的调制方法,主要思路:使用滤镜磨皮,然后调曲线选择需要更改的颜色通道,最后加上一些装饰效果就可以制作出自己喜爱的效果。 
最终效果

1.打开原图按Ctrl J 复制一份
2.简单磨下皮
3.新建调整图层选择曲线,调RGB通道和蓝色通道参数设置如下图
4.向下合并图层
5.执行菜单:滤镜 > 渲染 > 镜头光晕.105海米的那个,180%.然后把模式改为“线性加深”
6.执行:图像 > 调整 > 照片滤镜 颜色设置为:#3af8f6,浓度30%
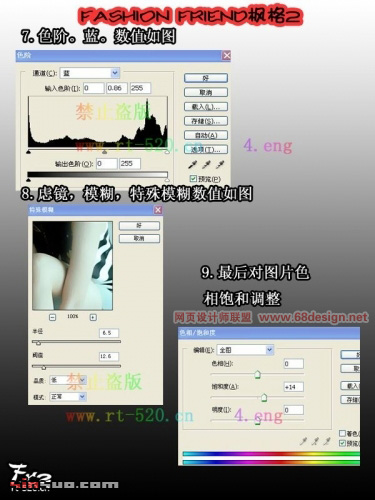
7.按Ctrl L 调色阶,参数设置如下图上选择蓝色通道。
8.执行:滤镜 > 模糊 > 特殊模糊 参数甚至如下图左下
9.最后按Ctrl U 调色相/饱和度参数设置如下图右下。完成最终效果。

原图

最终效果

1.打开原图按Ctrl J 复制一份
2.简单磨下皮
3.新建调整图层选择曲线,调RGB通道和蓝色通道参数设置如下图
4.向下合并图层
5.执行菜单:滤镜 > 渲染 > 镜头光晕.105海米的那个,180%.然后把模式改为“线性加深”
6.执行:图像 > 调整 > 照片滤镜 颜色设置为:#3af8f6,浓度30%

7.按Ctrl L 调色阶,参数设置如下图上选择蓝色通道。
8.执行:滤镜 > 模糊 > 特殊模糊 参数甚至如下图左下
9.最后按Ctrl U 调色相/饱和度参数设置如下图右下。完成最终效果。

学习 · 提示
相关教程
关注大神微博加入>>
网友求助,请回答!


![[非主流PS教程] 非主流加眼睫毛教程](http://pic.16xx8.com/article/UploadPic/2007/10/26/2007102673341809_lit.jpg)
