[非主流PS教程] Photoshop打造浪漫情侣feizhuliu效果
来源:不详
作者:佚名
学习:168人次
Photoshop打造浪漫情侣feizhuliu效果 作者:王伟光 教程来源:eNet
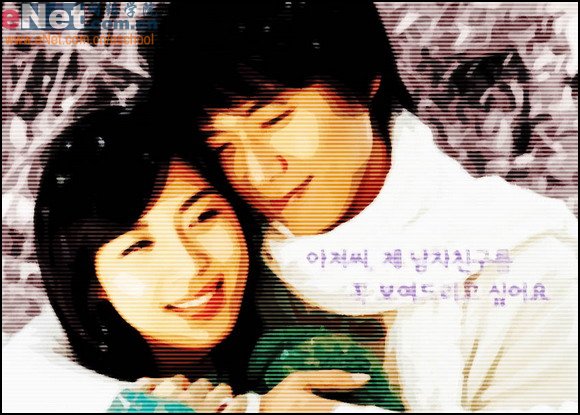
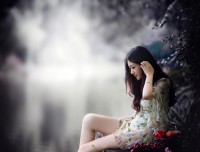
先看一下效果:

本新闻共5
制作工具:Photoshop CS
制作过程:
1、打开一张照片,效果如图01所示。

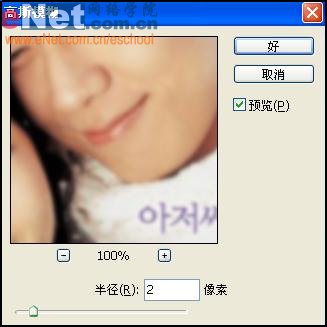
2、执行菜单栏中的“滤镜”“模糊”“高斯模糊”命令,设置半径为2,如图02所示,图像效果如图03所示。

本新闻共5
3、在图层面板中,复制背景层为背景副本图层,并将该层隐藏备用。
4、选择背景层,执行菜单栏中的“滤镜”“艺术效果”“木刻”命令,在弹出的木刻对话框中设置色阶数为8,边缘简化度为4,边缘逼真度为2,如图04所示,图像效果如图05所示。


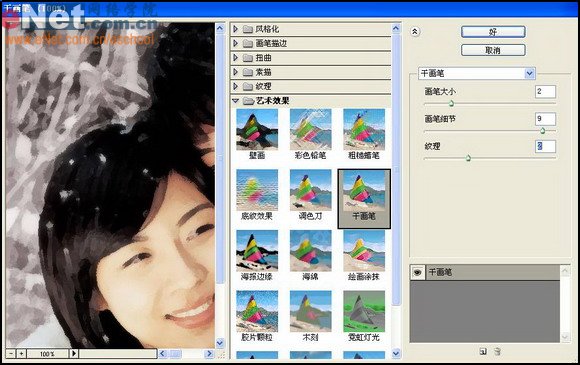
5、选择背景副本图层,执行菜单栏中的“滤镜”“艺术效果”“干画笔”命令,在弹出的干画笔对话框中设置画笔大小为2,画笔细节为9,纹理为2,效果如图06所示,图像效果07所示。

本新闻共5
6、在图层面板中设置图层混合模式为“叠加”,图像效果如图08所示。

7、新建一个图层,选择工具箱中的“放大镜”,将图像放大到1600%。选择工具箱中的“铅笔工具”,设置画笔大小单为1.
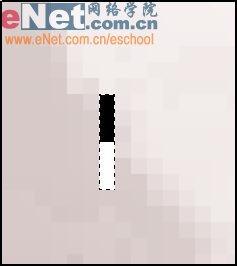
8、设置前景色和背景色为黑色和白色,在画面中绘制两种颜色各3个像素的图案,选择工具箱中的“矩形选框工具”,在图案外绘制选区,图像效果如图09所示。
9、执行菜单栏中的“编辑”“定义图案”命令,将刚才绘制的定义为图案。
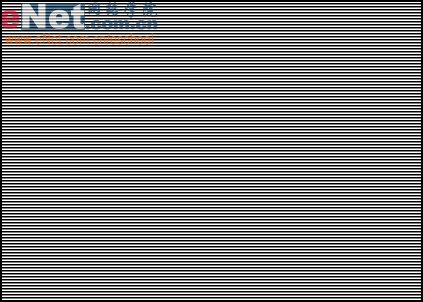
10、执行菜单栏中的“编辑”“填充”命令,在弹出的对话框中设置使用图案为刚才存储的图案,效果如图10所示。
本新闻共5
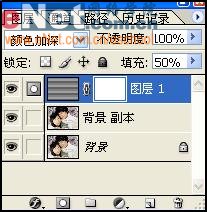
11、在图层面板中设置图层的混合模式为“颜色加深”,效果如图11所示。

12、在图层面板中设置填充的不透明度为50%,图像效果如图12所示。
13、单击图层面板中的添加图层蒙版按钮,为图层1添加图层蒙版,如图13所示,设置前景色为黑色背景色为白色,选择工具箱中的“渐变工具”,自左上到右下绘制渐变,最终效果如图14所示。
简单的,我们教你,深奥的,你来分享,非主流照片|qqkongjian|feizhuliu|tupian|luntan|psjiaocheng|bishua|ruanjian|chajian|xiazai|psxiazai|qqkongjiandaima
先看一下效果:
本新闻共5
制作工具:Photoshop CS
制作过程:
1、打开一张照片,效果如图01所示。
2、执行菜单栏中的“滤镜”“模糊”“高斯模糊”命令,设置半径为2,如图02所示,图像效果如图03所示。
本新闻共5
3、在图层面板中,复制背景层为背景副本图层,并将该层隐藏备用。
4、选择背景层,执行菜单栏中的“滤镜”“艺术效果”“木刻”命令,在弹出的木刻对话框中设置色阶数为8,边缘简化度为4,边缘逼真度为2,如图04所示,图像效果如图05所示。
5、选择背景副本图层,执行菜单栏中的“滤镜”“艺术效果”“干画笔”命令,在弹出的干画笔对话框中设置画笔大小为2,画笔细节为9,纹理为2,效果如图06所示,图像效果07所示。
本新闻共5
6、在图层面板中设置图层混合模式为“叠加”,图像效果如图08所示。
7、新建一个图层,选择工具箱中的“放大镜”,将图像放大到1600%。选择工具箱中的“铅笔工具”,设置画笔大小单为1.
8、设置前景色和背景色为黑色和白色,在画面中绘制两种颜色各3个像素的图案,选择工具箱中的“矩形选框工具”,在图案外绘制选区,图像效果如图09所示。
9、执行菜单栏中的“编辑”“定义图案”命令,将刚才绘制的定义为图案。
10、执行菜单栏中的“编辑”“填充”命令,在弹出的对话框中设置使用图案为刚才存储的图案,效果如图10所示。
本新闻共5
11、在图层面板中设置图层的混合模式为“颜色加深”,效果如图11所示。
12、在图层面板中设置填充的不透明度为50%,图像效果如图12所示。
13、单击图层面板中的添加图层蒙版按钮,为图层1添加图层蒙版,如图13所示,设置前景色为黑色背景色为白色,选择工具箱中的“渐变工具”,自左上到右下绘制渐变,最终效果如图14所示。
简单的,我们教你,深奥的,你来分享,非主流照片|qqkongjian|feizhuliu|tupian|luntan|psjiaocheng|bishua|ruanjian|chajian|xiazai|psxiazai|qqkongjiandaima
学习 · 提示
相关教程
关注大神微博加入>>


网友求助,请回答!