photoshop制作简单绚丽的导航效果
来源:未知
作者:学有所成
学习:375人次
本教程主要用photoshop来制作一款水晶导航条,现在的网站越来越注重界面设计,当然导航条也不例外,喜欢的朋友让我们一起来开始吧
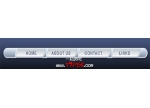
先看看效果吧! :)

第1步:新建文件,大小500x 200px ,选择渐变工具(G),(径向渐变)从#363636到#252525。 最左边拖动到右下角。

第2步:新建层, 选择选区工具(M),固定大小为100 x 40px

第3步:填充线性渐变从 #68ad40和#4c8c2c .

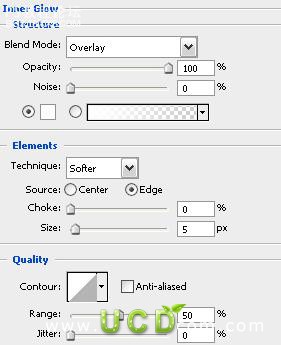
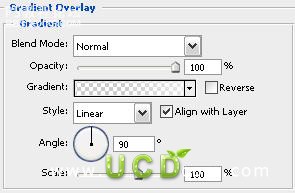
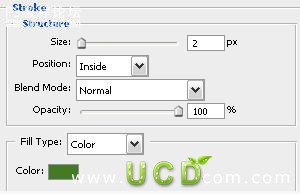
第4步:选着图层样式 内发光 渐变叠加 描边#427a25
现在您的按钮应该是这样的.

,第5步:新建层,同时选种新层和按钮层合并(ctrl+E),现在做一些发光效果,加深工具(O),笔头大小为45px,不透明度为10%,围绕按钮四周加深。 第6步:现在,选择减淡工具(O),使用了一个14像素的软刷,不透明度为10%
第5步:新建层,同时选种新层和按钮层合并(ctrl+E),现在做一些发光效果,加深工具(O),笔头大小为45px,不透明度为10%,围绕按钮四周加深。

第6步:现在,选择减淡工具(O),使用了一个14像素的软刷,不透明度为10%。 (小鱼提醒:选择高光)

第7步:复制按钮如图:

第8步:新建层,灰色到透明,选择编辑 变换 透视

第9步:降低透明度为10%。

第10步:最后,添加一些文字。小鱼完成:)您呢(*^__^*) 嘻嘻……
作者:小鱼 出处:UCD博客
先看看效果吧! :)
第1步:新建文件,大小500x 200px ,选择渐变工具(G),(径向渐变)从#363636到#252525。 最左边拖动到右下角。
第2步:新建层, 选择选区工具(M),固定大小为100 x 40px
第3步:填充线性渐变从 #68ad40和#4c8c2c .
第4步:选着图层样式 内发光 渐变叠加 描边#427a25
现在您的按钮应该是这样的.
,第5步:新建层,同时选种新层和按钮层合并(ctrl+E),现在做一些发光效果,加深工具(O),笔头大小为45px,不透明度为10%,围绕按钮四周加深。 第6步:现在,选择减淡工具(O),使用了一个14像素的软刷,不透明度为10%
第5步:新建层,同时选种新层和按钮层合并(ctrl+E),现在做一些发光效果,加深工具(O),笔头大小为45px,不透明度为10%,围绕按钮四周加深。
第6步:现在,选择减淡工具(O),使用了一个14像素的软刷,不透明度为10%。 (小鱼提醒:选择高光)
第7步:复制按钮如图:
第8步:新建层,灰色到透明,选择编辑 变换 透视
第9步:降低透明度为10%。
第10步:最后,添加一些文字。小鱼完成:)您呢(*^__^*) 嘻嘻……
作者:小鱼 出处:UCD博客
学习 · 提示
相关教程
关注大神微博加入>>


网友求助,请回答!